Help:Using the old TypeCraft Editor
Contents
Help with the old TypeCraft Editor
For a more detailed description of how you annotate in TypeCraft follow the following link TypeCraft Annotation - An Introduction. Here is a Ouick Start for those that are already experienced in using digital linguistic tools
Quick Start to annotation in TC
Click *My Text* in the navigation-bar. The TC Editor opens. You may now enter or copy-and-paste a text into the left part of the editor window. Do not add morpheme boundaries at this point. At this point the TC Editor only accepts text strings.Before you start to tokenize your text strings, determine the language of your text by going to the *CHANGE* button. TC uses the ISO-639-1 code for languages. Please use the drop-down window to selecting one of the ISO language names. Give your text a title and a title translation if appropriate. Text title and title translation will inform *Text search* and therefore should be chosen with care.
Tokenization You can tokenise your text into sentences. This generally works quite well. TypeCraft has at this point still problems with periods for example in titles like Mr. or Dr. and semicolons. In order to tokenise you text or collection of sentences press *CREATE PHRASES*; this will initiate the tokenization. Inspect the result before you choose *Yes* from the dialogue box. If you have not highlighted parts of your text, TC will ask you whether you would like to tokenize the whole text. Say *Yes*. The tokenization can be repeated several times until you are content with the result.
Morpheme break-up Select a sentence from the set of tokenised sentences which now have appeared on the right hand side of your editor window. Click on one sentence. This will open a dialogue box. Follow the instructions in the dialogue box to insert morpheme boundaries into the annotation table.
Annotation Table Navigate through the annotation levels vertically by making use of the space bar. The *WORD* and the *MORPH* tier feature a menu bar which allows you to delete words/morphs which appears when you click on the field in these rows that you would like to change. From the menu you can also add words or change the word segmentation. *Gloss* and *POS* tags are chosen from a predefined list. You find an overview over all Gloss and POS tags on your navigation bar. These lists are auto-generated and can be ordered by category at your convenience.
Export
The TypeCraft user-interface allows for several forms of export:
- Export to the TCwiki
- Export to HTML
- Export to WORD and Open Office
In your TypeCraft Editor go to the tab *Phrase* in the upper left corner of your editor window. When pressing on *Phrase* a drop-down window opens. Select the first option which is: *Export*.
Export to the TCwiki
For a description of the export to the TCwiki, please follow this link: Export to the TC wiki.
Export to WORD and Open Office
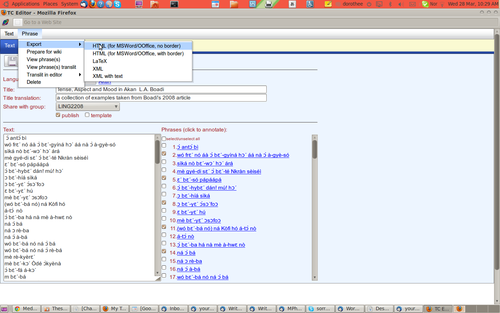
The export to WORD or Open Office is done through several simple steps: Go to the TypeCraft Editor by opening *My texts*. You select on of your text and open it. This can look for example like this:
As shown in the picture on the left, you can now select the sentences that you would like to export by marking them in the check boxes on the left of the instantiated sentences (The blue sentences to the right of the Editor window). Go to the tool tabs of the Editor window and select Phrases -> Export -> HTML (Just as it is shown in the picture). You have the choice to export the examples with or without border. Make your choice and save the Tc-export file to your computer. (You will see a small pop-up window that asks you to either open or save the Tc-export file. You should save the file.) When you now open the exported file on your machine, the default option that you will be presented with is to open the file in your browser (for example Firefox,Chrome, IE or Safari). In order to save the Tc-export file as a WORD or Open Office document you have to open the file by choosing the option *Open with* -> WORD or Open Office. Notice that the imported examples can still be manipulated. For example you might want to change the font size or highlight certain glosses, add colour or borders.
This is a feature of your TypeCraft editor that must be set by the system administrator. In your mail to the administrator, please state which name you wish for your group (for example the name of your project or the name of the language you work on), and the TypeCraft user names of all members of the group that you would like to start. The system administrator will create the group for you. This will not take very long, and when the group is created, you can start to assign texts to your group, by selecting in your TypeCraft Editor from the *Share with group* line your group.
